Get Started
This guide will explain how to get API keys and start testing with Vezgo’s pre-built Connect Flow. Follow the steps below to get started.
Sign-up for API Keys
Go to Vezgo’s Portal and create an account.
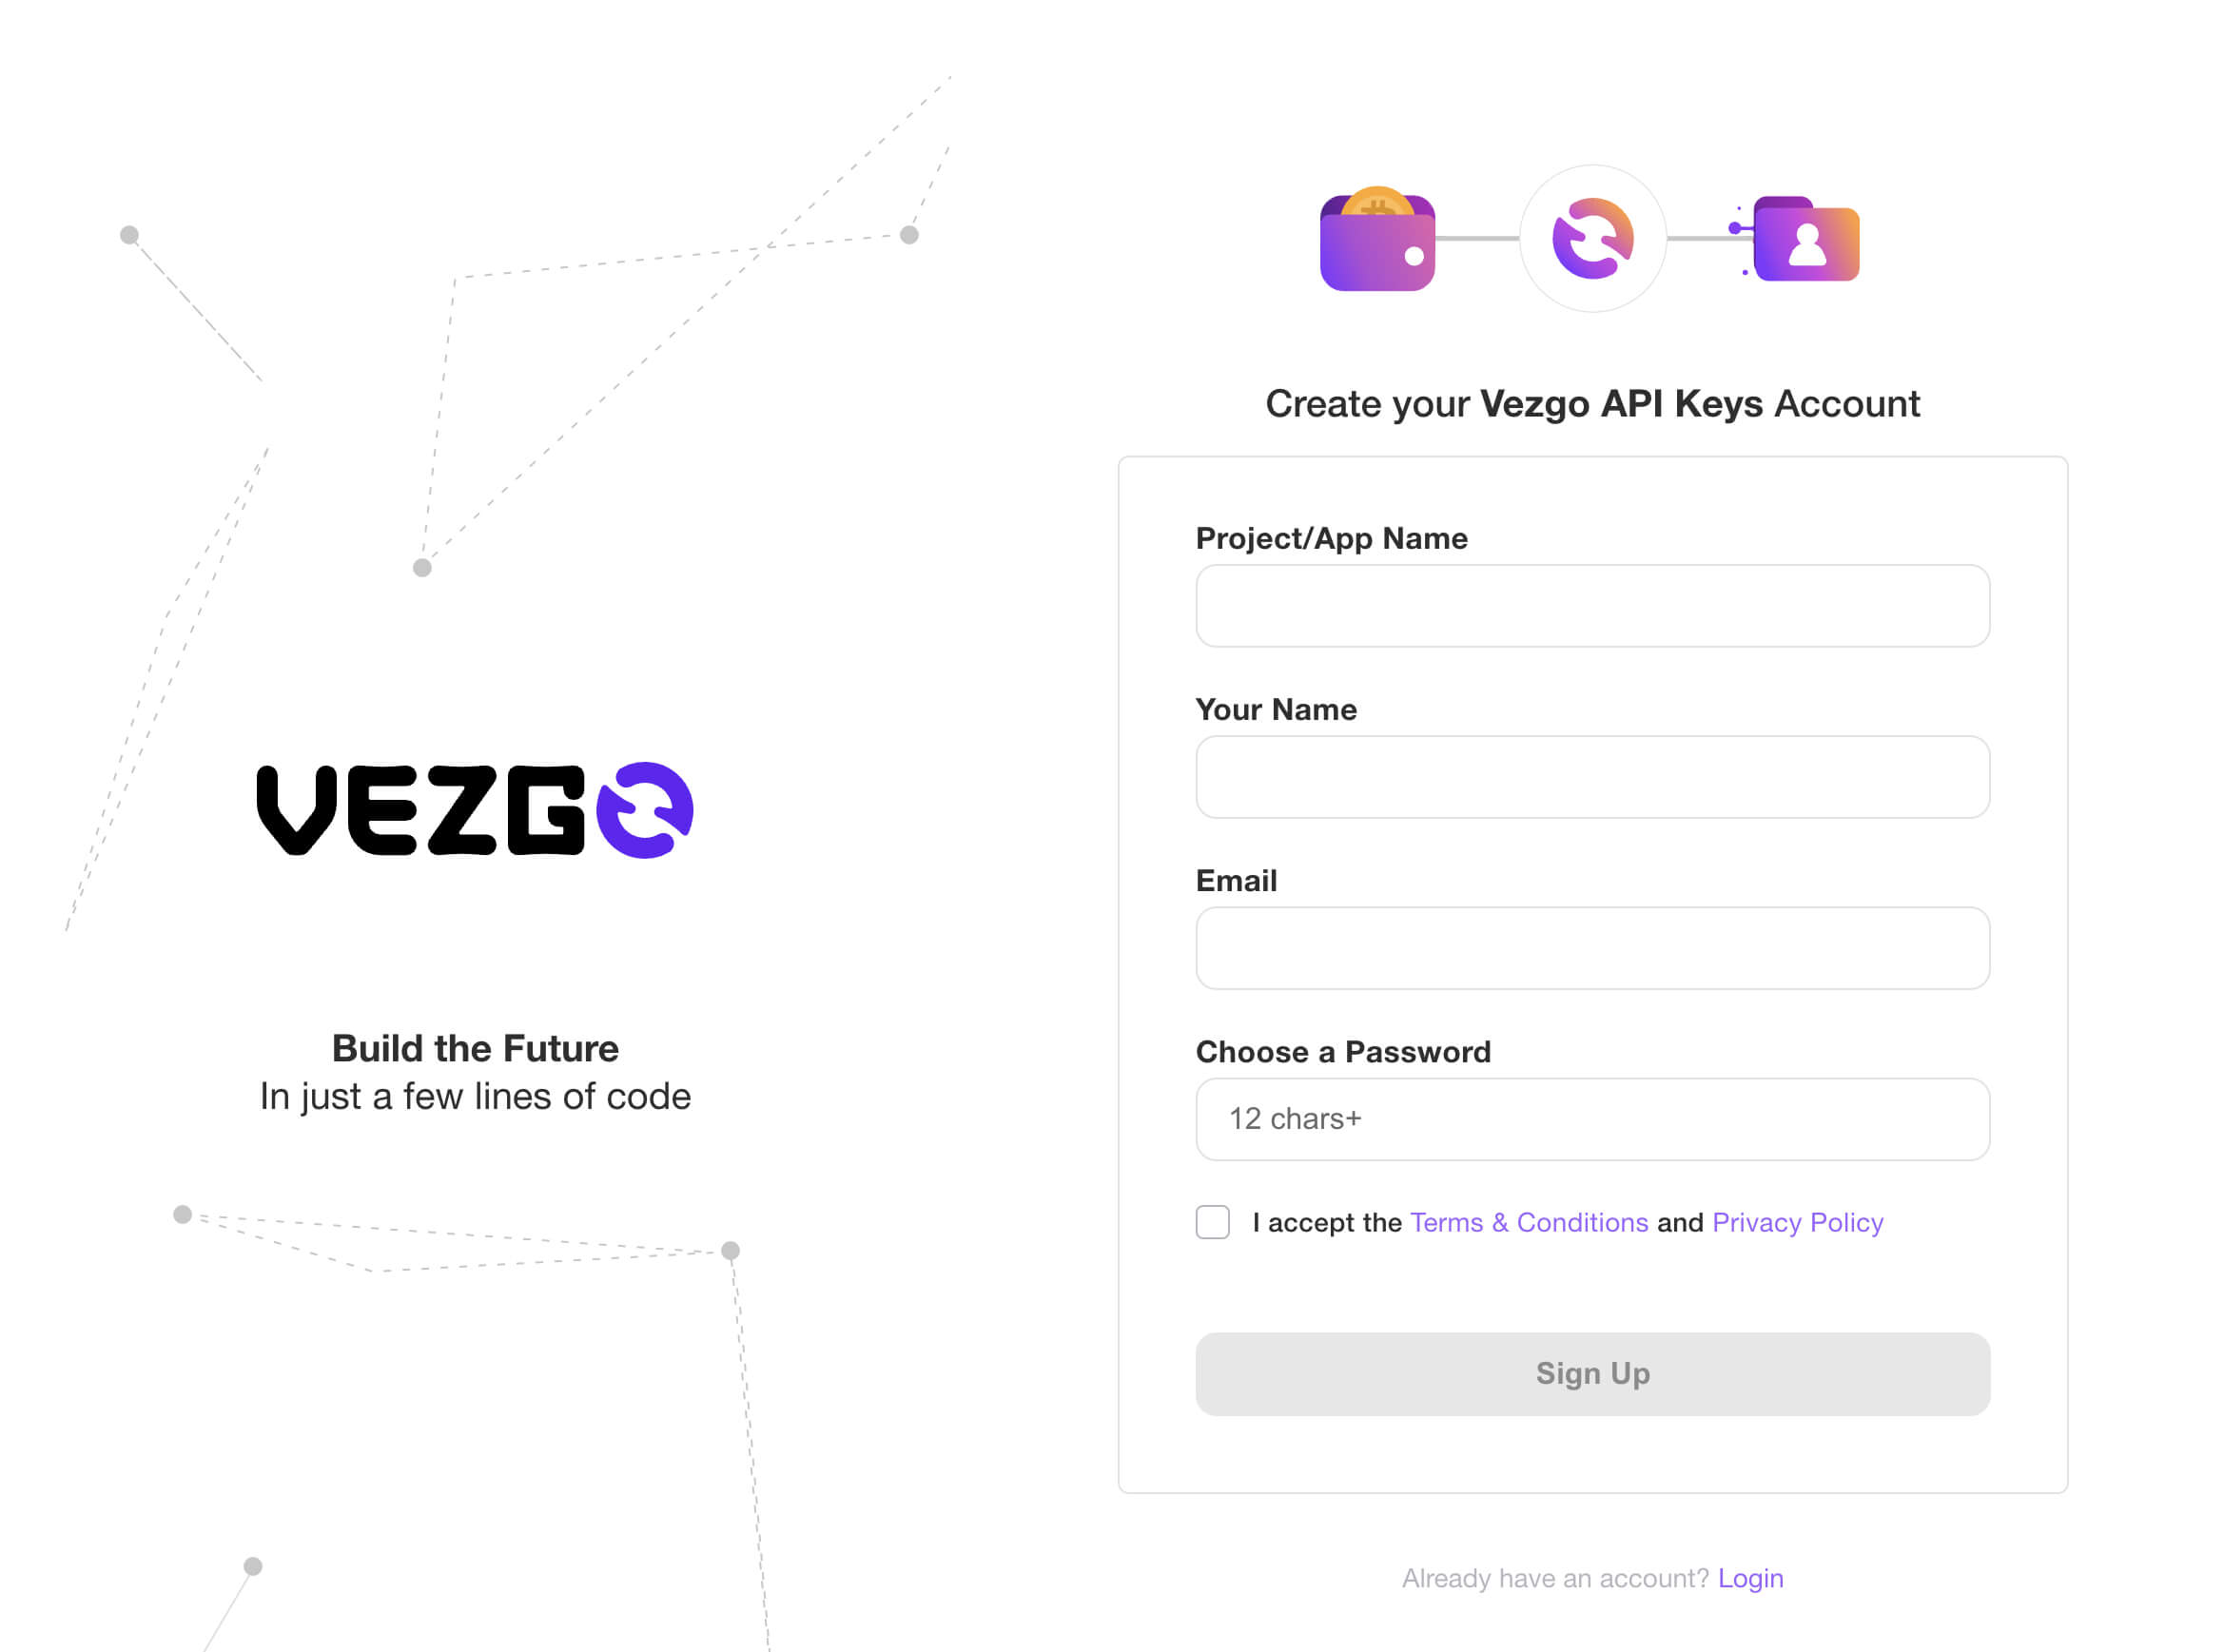
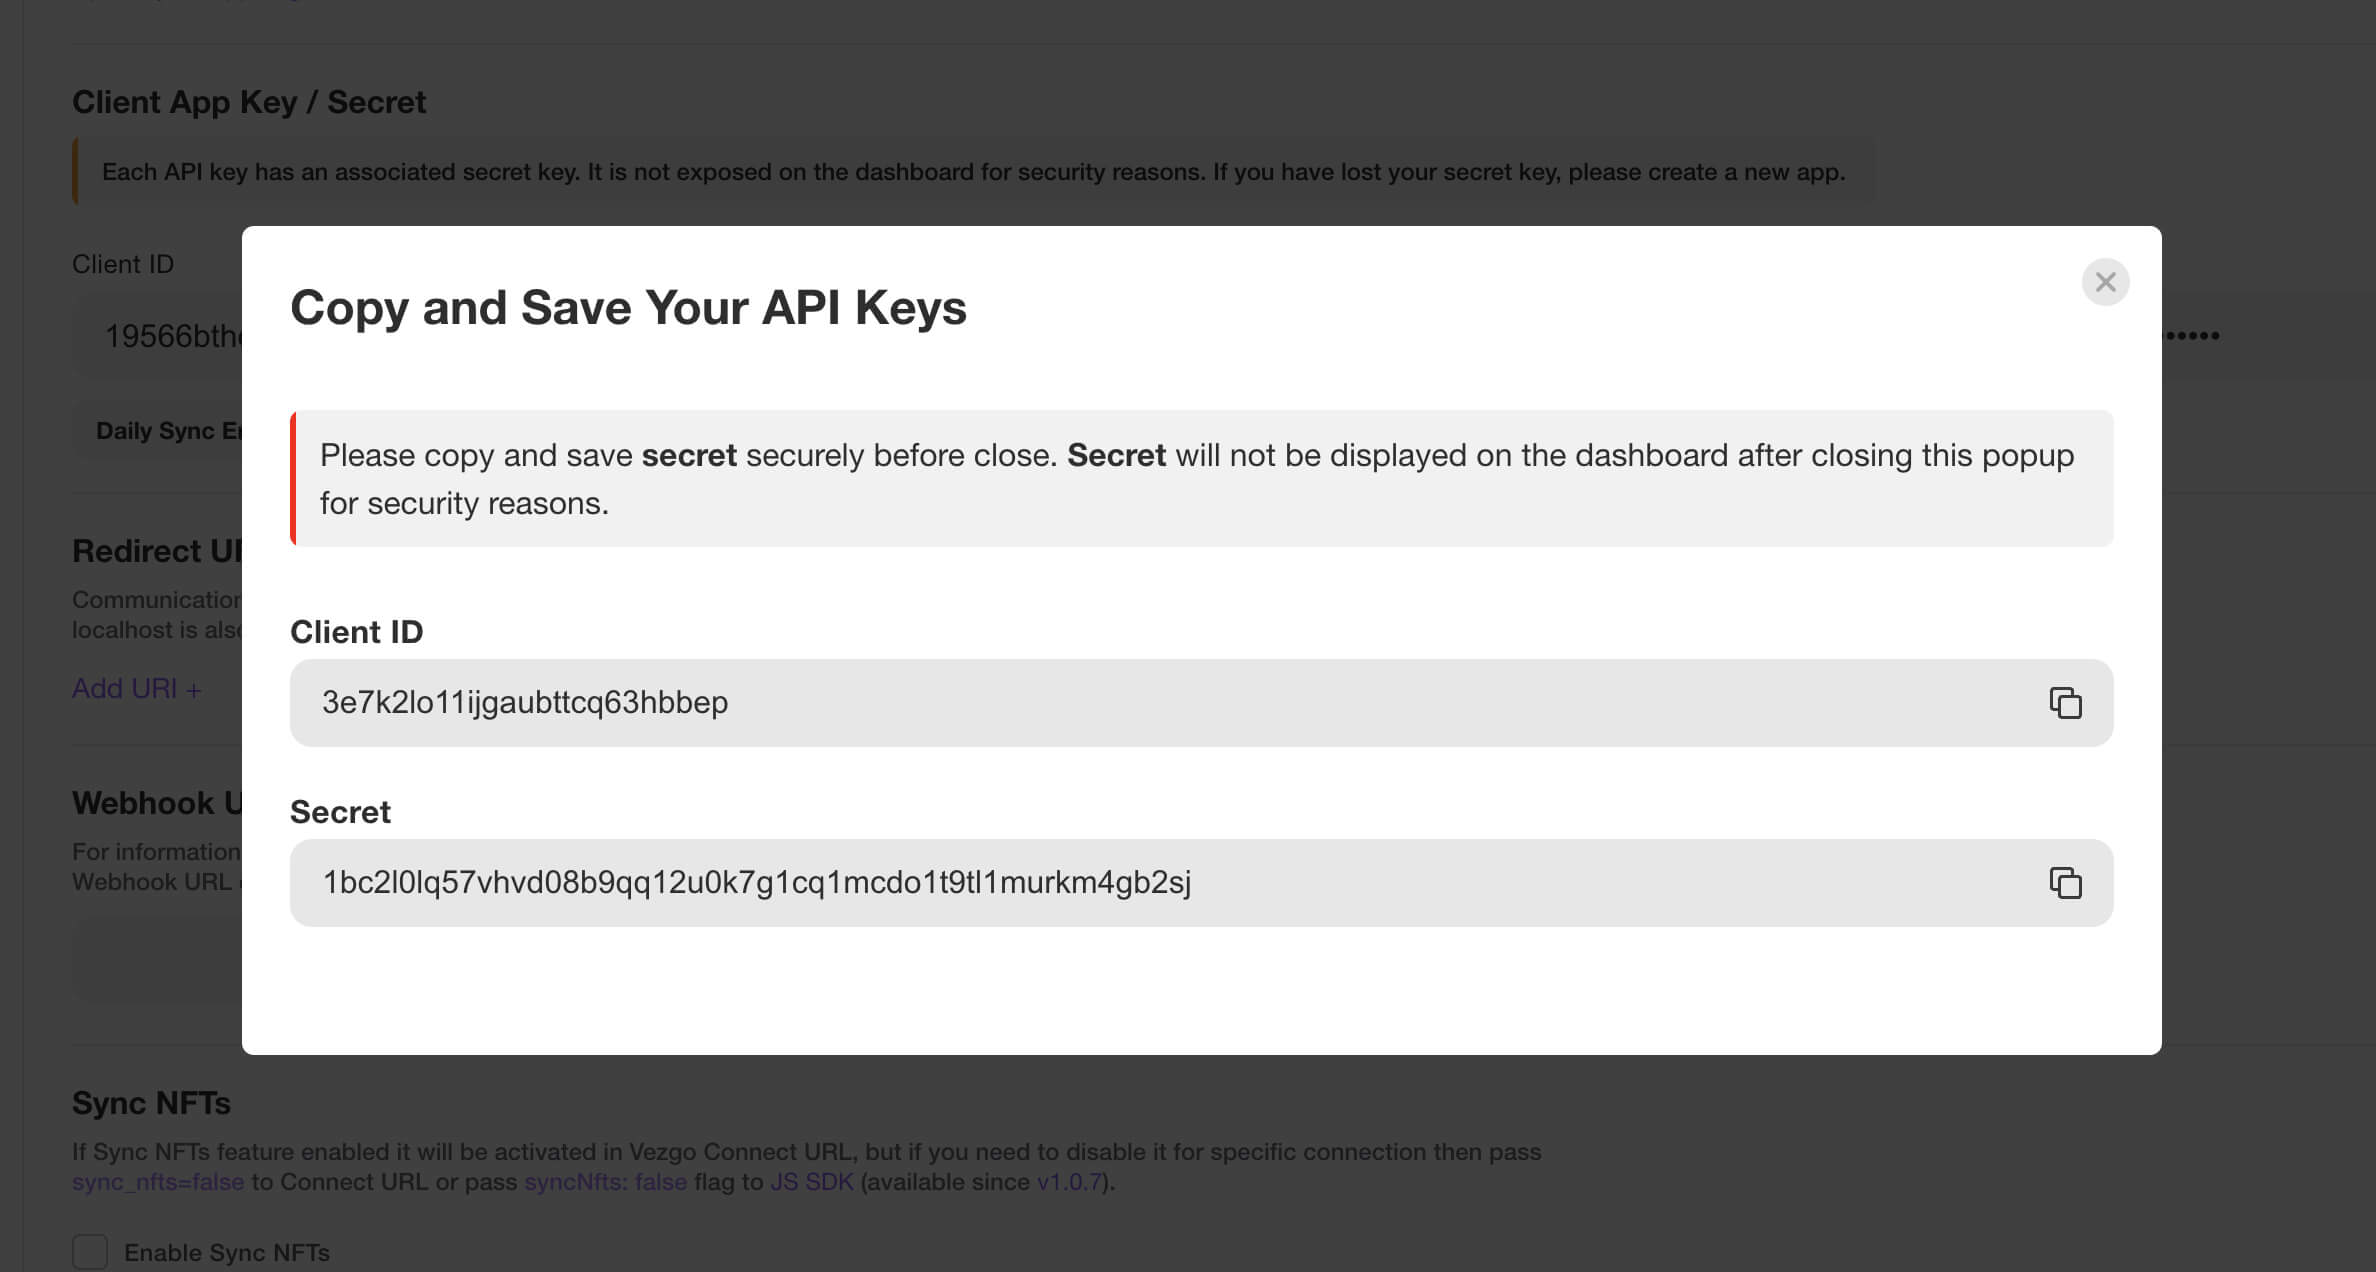
Following these steps will automatically create your app, and take you to your portal. You now have access to your unique Client ID and Client Secret. Important: Your Client Secret is only available at this time. Please make a note of it and keep it in a safe place.
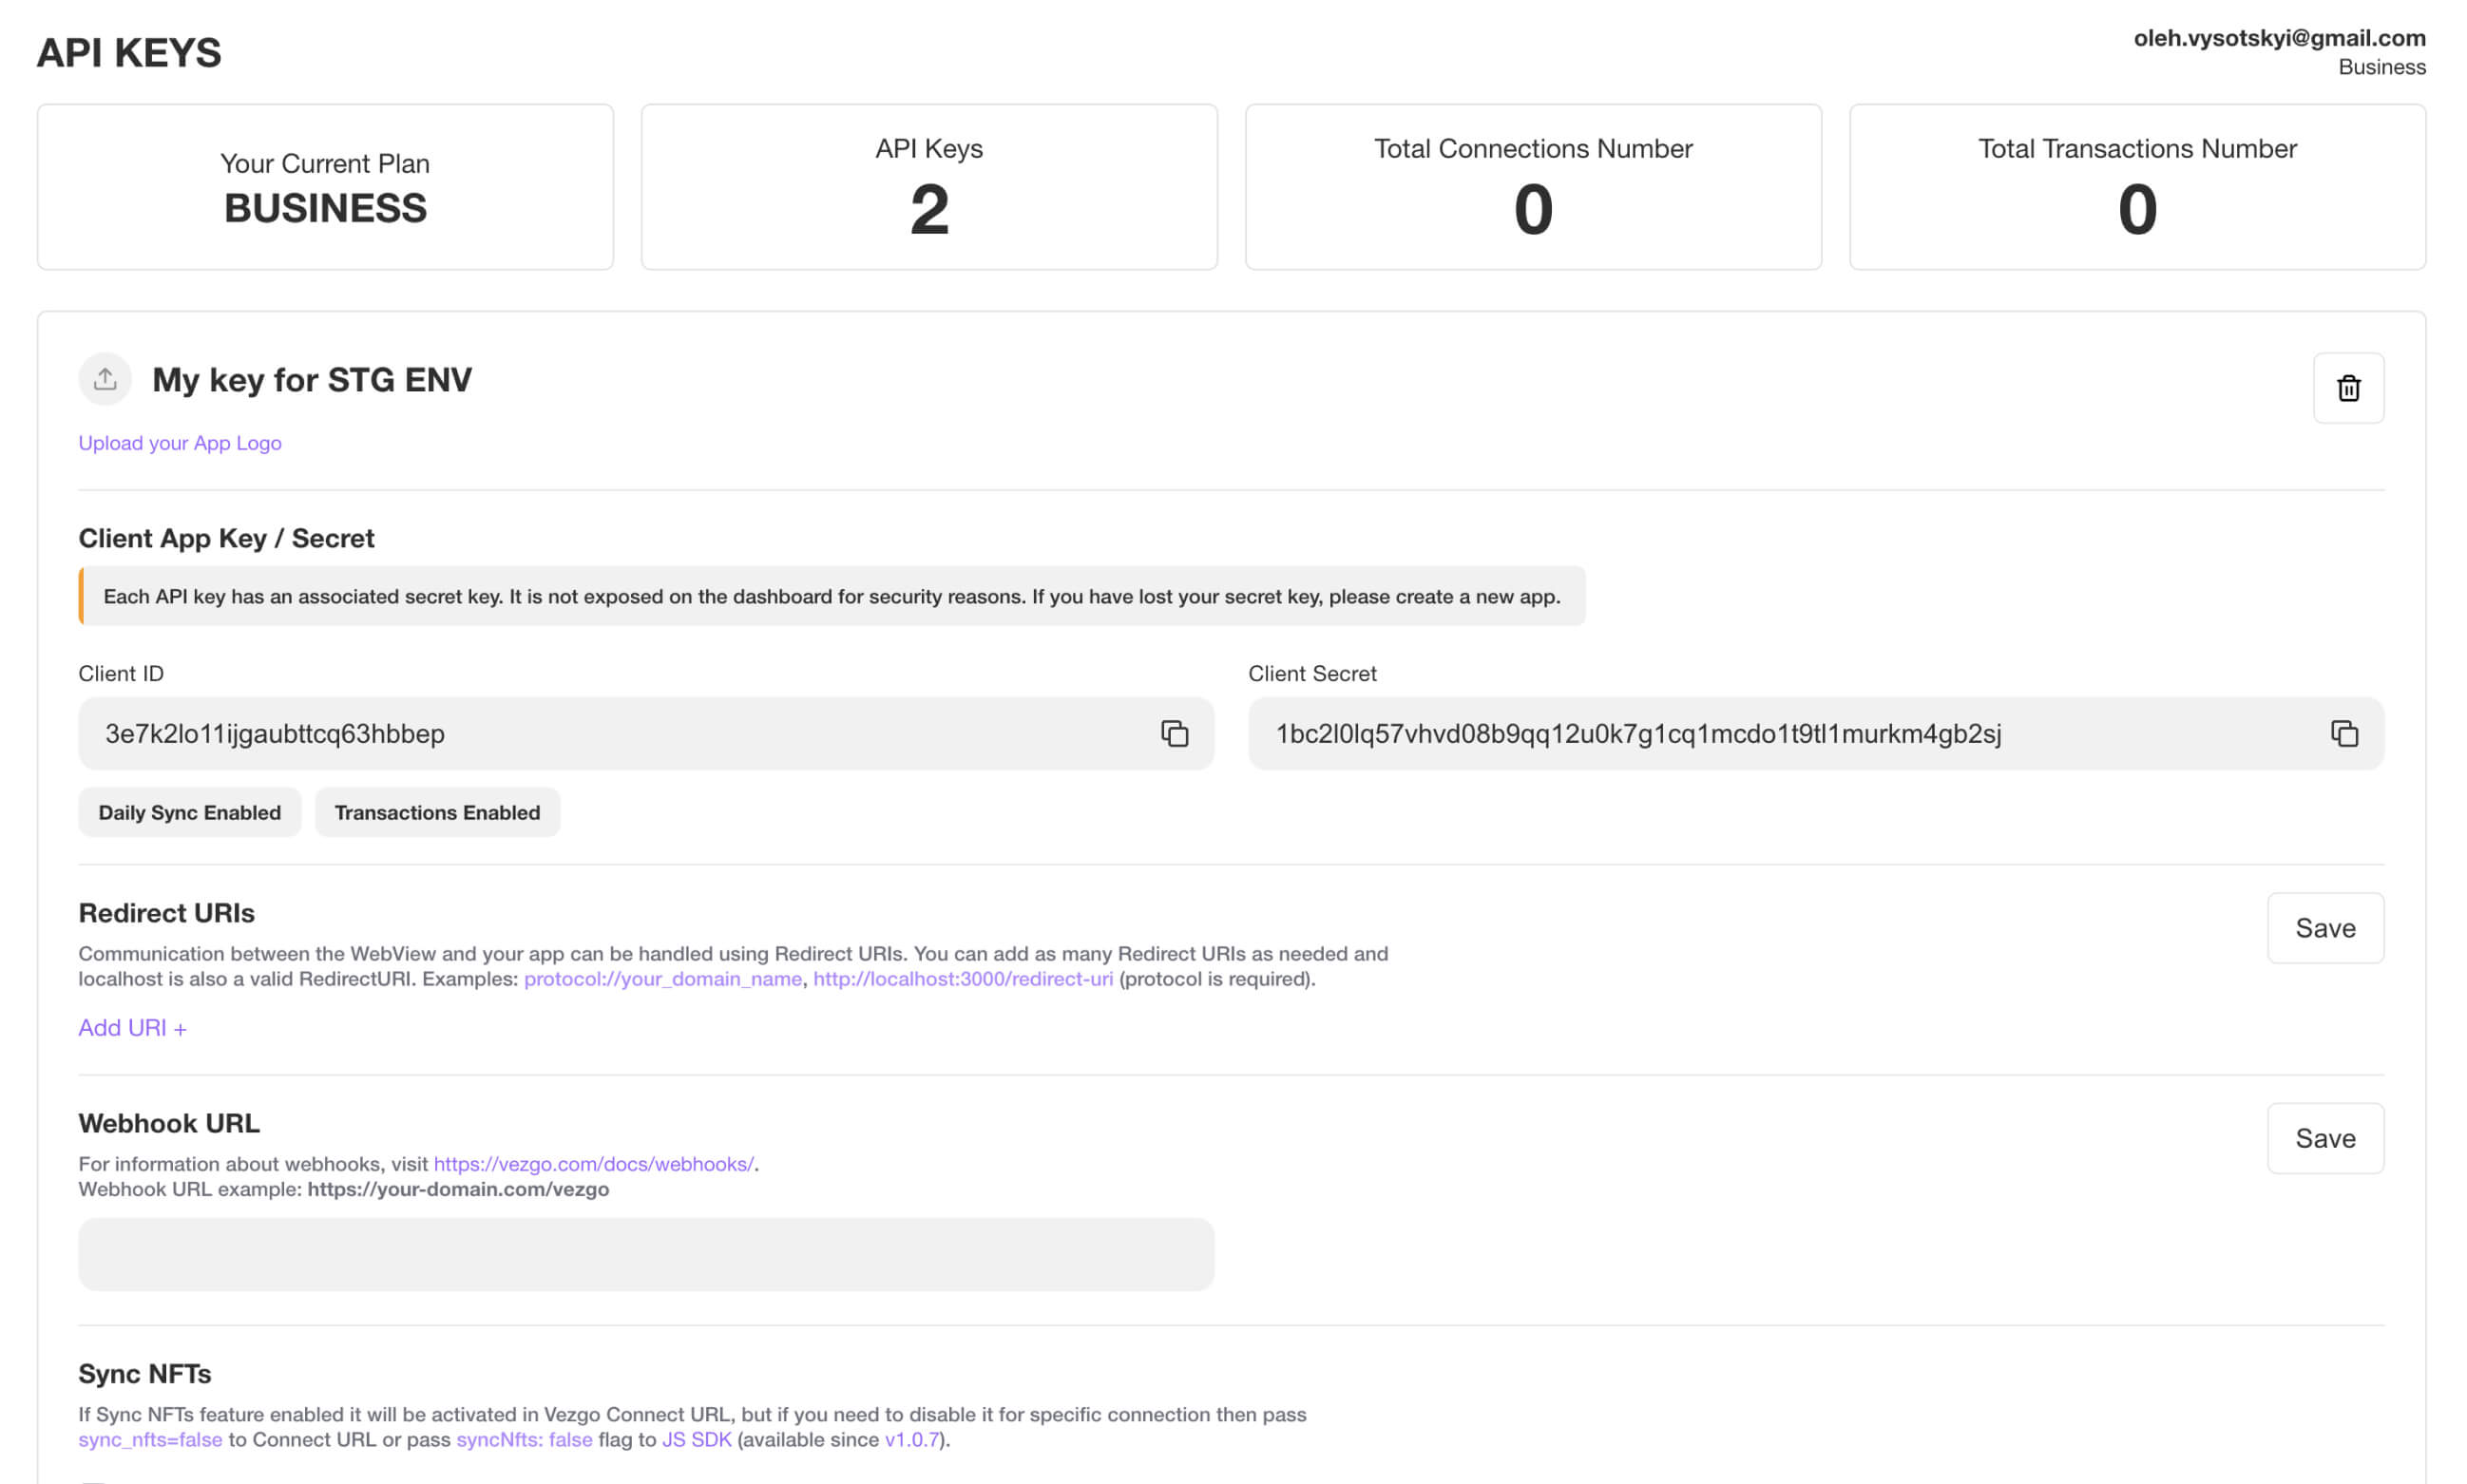
The free version of the API includes 5 connections which includes accounts, balances and limited number of transactions. For access to webhooks and other features, you need a full access key, that can be activated in our portal. See our Pricing page for more details. Book a meeting if you need any help or have any questions: Book a meeting
Quickstart example
The best way to get started with Vezgo API is via the Vezgo JS SDKs (Frontend and Backend). You can take a look at the Vezgo Example project or follow the steps below:
1. Import the SDK
You can import the distribution build directly in your webpage:
<!-- Import the specific version -->
<script src="https://unpkg.com/vezgo-sdk-js@1.0.3/dist/vezgo.umd.js"></script>

<!-- Or import the latest version (may contain breaking changes) -->

<script src="https://unpkg.com/vezgo-sdk-js/dist/vezgo.umd.js"></script>
Or install and import it in a JS build system / NodeJS.
The same package is used for both frontend (web, mobile or desktop app) and backend (NodeJS).
npm install --save vezgo-sdk-js
// commonjs
const Vezgo = require('vezgo-sdk-js');

// esX
import Vezgo from 'vezgo-sdk-js';

// React Native
import Vezgo from 'vezgo-sdk-js/dist/vezgo.es5';
2. Initialize the vezgo instance
A vezgo instance is initialized using your Client ID and Client Secret in the backend, or only Client ID in the frontend.
const vezgo = Vezgo.init({
  clientId: 'YOUR_CLIENT_ID',
  secret: 'YOUR_CLIENT_SECRET',
});
const vezgo = Vezgo.init({
  clientId: 'YOUR_CLIENT_ID',
  // optional parameters for authenticating the vezgo frontend instance with your server.
  // See Authentication section for a more detailed explanation.
  authEndpoint: '/vezgo/auth', // default value, need to accept POST
  auth: {
    params: { userId: 'LOGGED_IN_USER_ID' }, // custom params for authEndpoint
    headers: {}, // custom headers for authEndpoint
  },
});
Log in a user to create a user instance if you want to request user data.
const user = vezgo.login('USERNAME');
// No need to pass username because it's assumed that the `authEndpoint`
// implementation on your backend server should already know that from
// your authenticated user.
const user = vezgo.login();
3. Connect a user, or request for data.
Start the Connect process for users to connect their institutions, or call the SDK helper methods to request data.
// Get general Vezgo data
const providers = await vezgo.providers.getList();

// Get user data via the `user` instance
const account = await user.accounts.getOne('ACCOUNT_ID');
// Get general Vezgo data
const providers = await vezgo.providers.getList();

// Start the Connect process when user clicks the Connect button
document.getElementById('#connect').addEventListener('click', () => {
  user.connect().onConnection(async accountId => {
    const account = await user.accounts.getOne(accountId);
    displayAccount(account);
  });
}, false);
Vezgo Connect Flow Schema
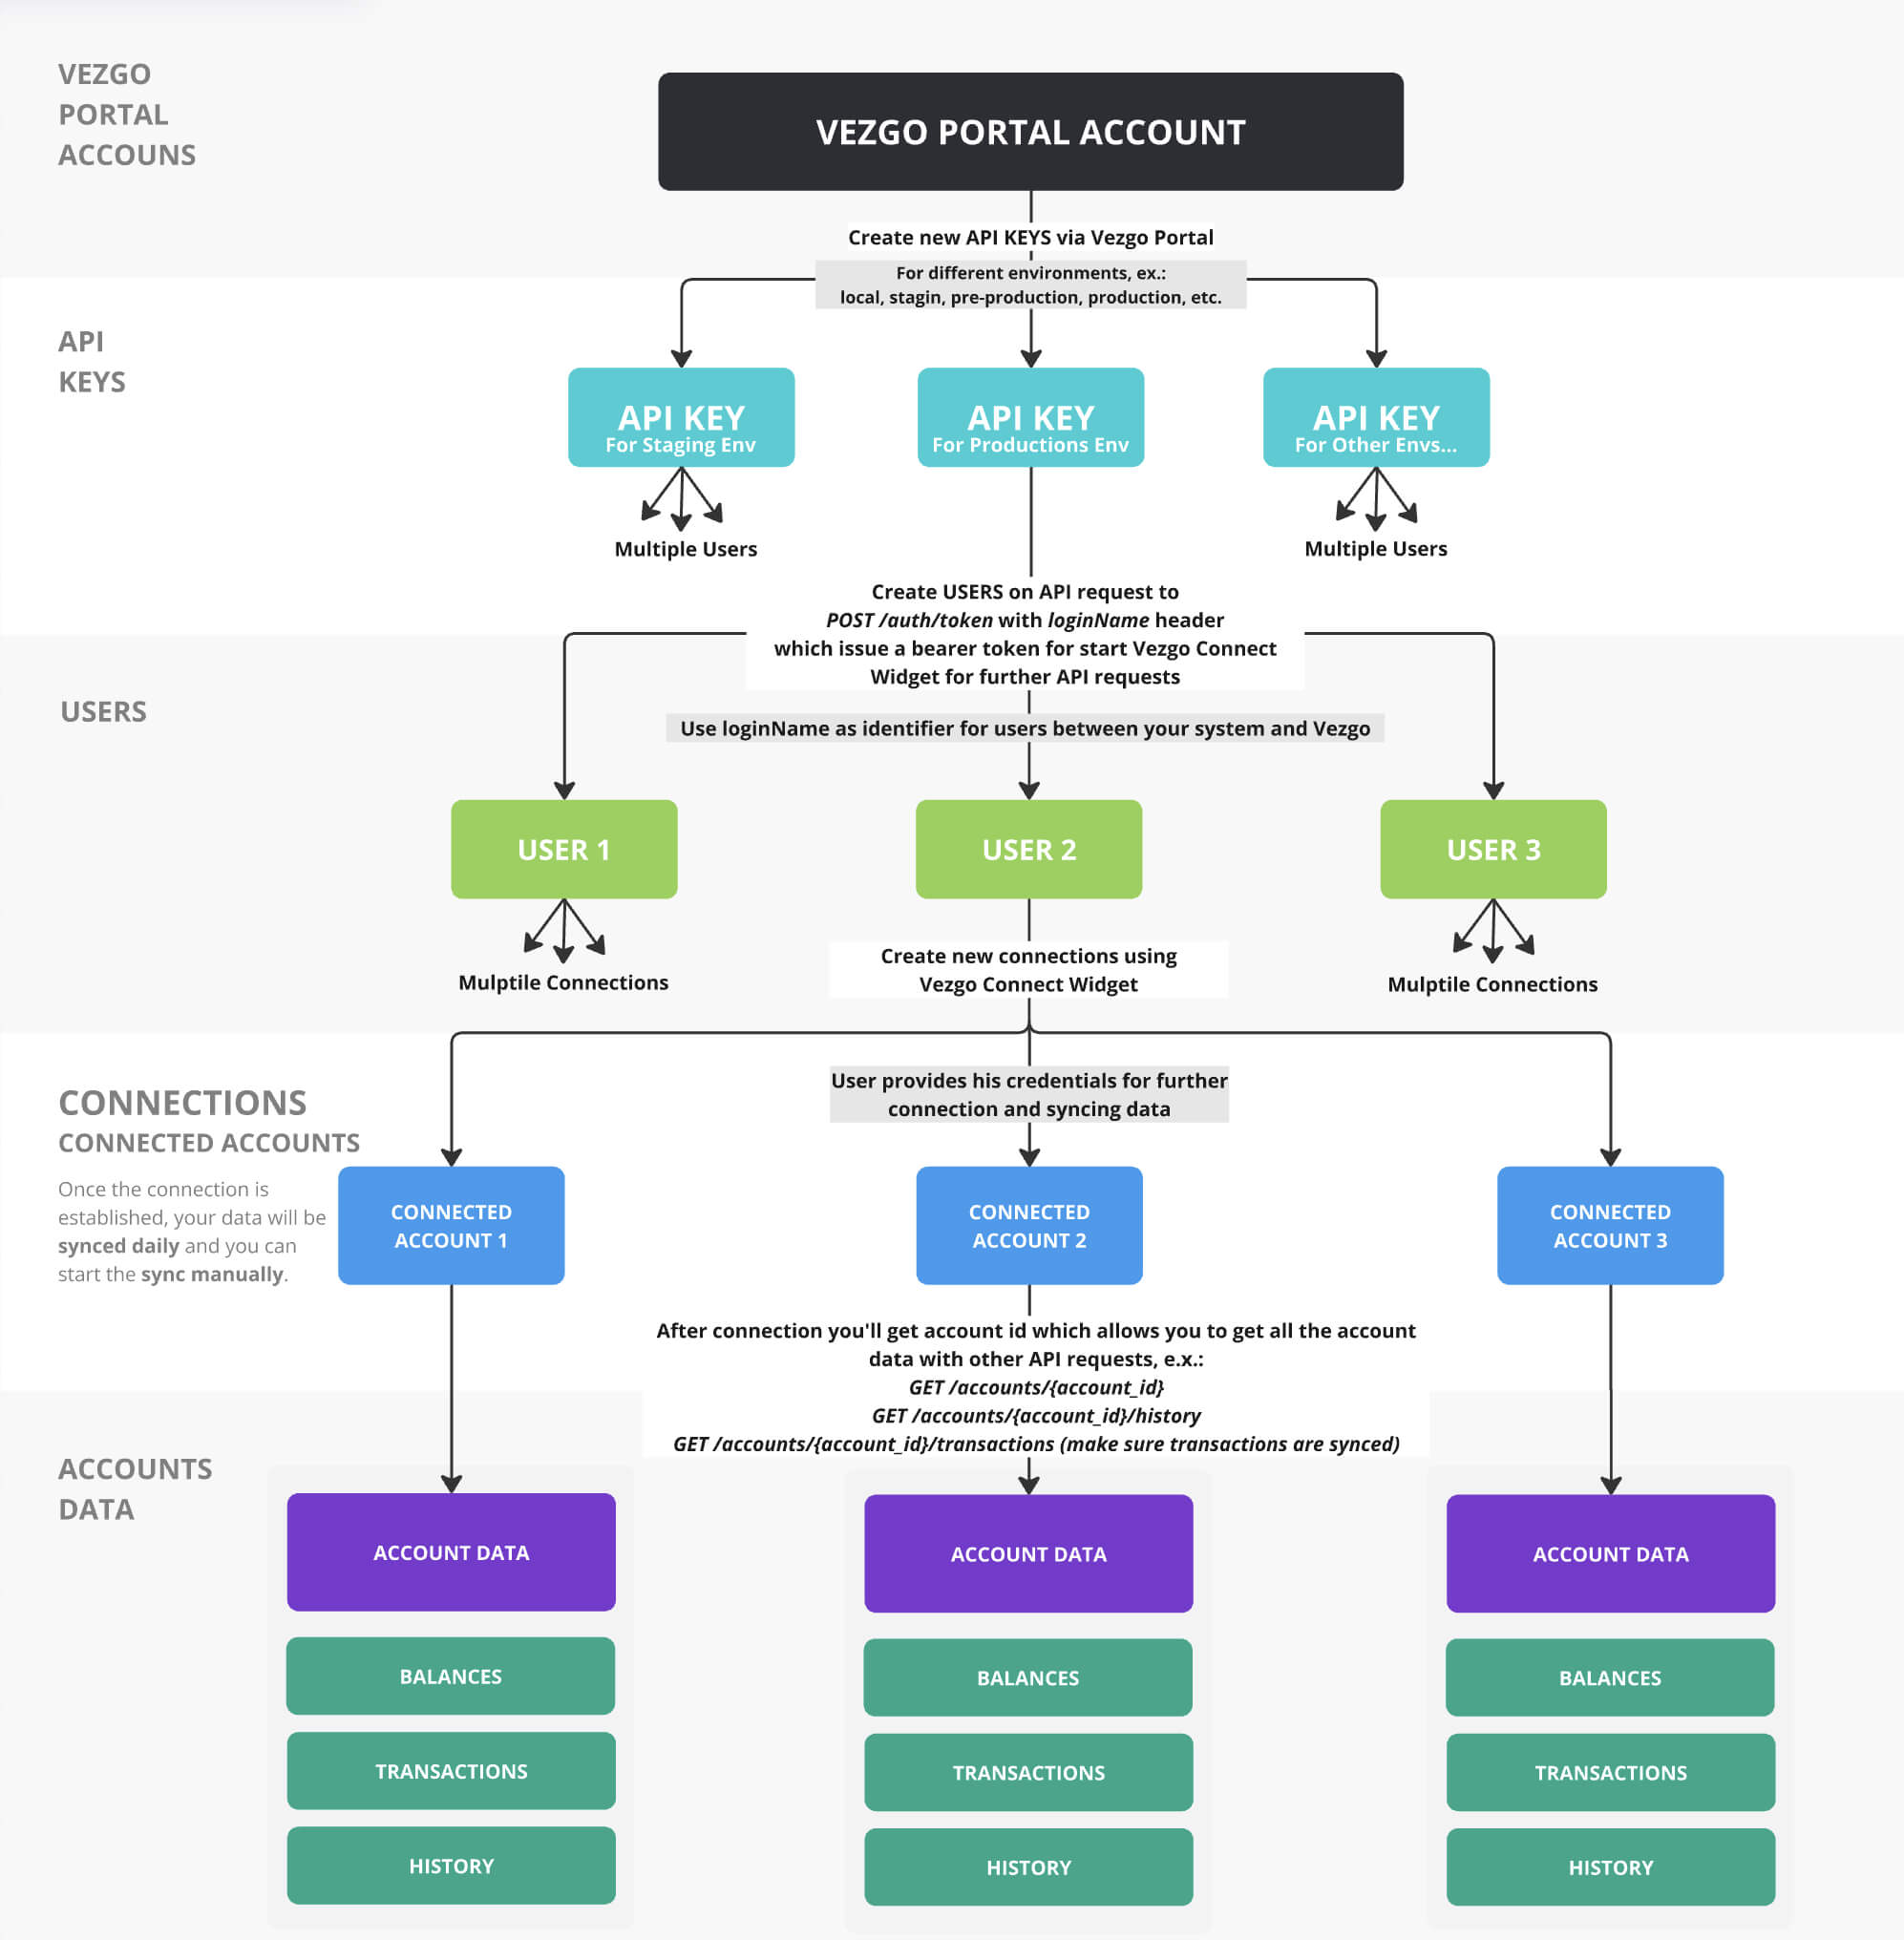
The Vezgo Connect Schema outlines the process for integrating with the Vezgo API to manage user connections, financial institutions, and account data. This step-by-step guide explains how to:
- Obtain API keys.
- Create users with a unique
loginName. - Connect to financial accounts.
- Retrieve and sync account data.
- Use the data in your application.
It also emphasizes the importance of the loginName as a unique identifier linking users between your app and Vezgo.
Step 1: Obtain API Keys
- What: Request API keys from the Vezgo Team to authenticate API requests.
- How:
- Create new API keys via the Vezgo Portal.
- Keys can be generated for different environments (e.g., local, staging, pre-production, production).
- Why: API keys are required to initiate all interactions with the Vezgo API.
Example:
- API Key for Staging Env: Used for testing.
- API Key for Production Env: Used for live deployment.
- API Key for Other Envs: For additional environments like local or pre-production.
Step 2: Create Users
- What: Create users on Vezgo using an API key and a unique
loginName. - How:
- Send a
POST /auth/tokenrequest with theloginNamein the header. - Vezgo issues a bearer token for that user to start the Vezgo Connect Widget or make further API requests.
- Send a
- Why: The bearer token authorizes actions on behalf of the user, ensuring secure access to their data.
Example:
- API Key for Production Env creates:
- User 1 with
loginName: user_12345→ Gets bearer token. - User 2 with
loginName: user_67890→ Gets bearer token. - User 3 with
loginName: user_98765→ Gets bearer token.
- User 1 with
Step 3: Establish Account Connections
- What: Connect users to their crypto, blockchain, CEX, and wallet accounts using the Vezgo Connect Widget.
- How:
- Users provide their account credentials (e.g., exchange login, wallet address) through the widget.
- Each user can connect to multiple accounts.
- Why: Connections enable Vezgo to access and sync financial data from the accounts.
- Details:
- Once a connection is established, data syncs daily.
- Manual sync can be triggered if immediate updates are needed.
Example:
- User 1 → Connected Account 1 (e.g., Coinbase - a centralized exchange (CEX)).
- User 2 → Connected Account 2 (e.g., Bitcoin wallet - a blockchain/wallet).
- User 3 → Connected Account 3 (e.g., Ethereum account via MetaMask - a wallet/blockchain).
Step 4: Retrieve and Sync Data
- What: Fetch financial data from connected accounts using API requests.
- How:
- Use endpoints like:
GET /accounts/{account_id}to retrieve data for a specific account.GET /accountsto get a list of all accounts.GET /transactions/{account_id}to fetch transaction history (ensuring transactions are synced).
- Use endpoints like:
- Why: Provides access to balances, transactions, and historical data for financial tracking.
- Details:
- Data syncs daily, with manual sync available as needed.
Example:
- Connected Account 1 → Account Data 1 (e.g., balances, transactions, history from Coinbase).
- Connected Account 2 → Account Data 2 (e.g., balances, transactions, history from Bitcoin wallet).
- Connected Account 3 → Account Data 3 (e.g., balances, transactions, history from Ethereum via MetaMask).
Step 5: Utilize Data
- What: Integrate the retrieved data into your application.
- How: Use the data for features like financial tracking, reporting, or analysis.
- Why: Enhances your app with real-time financial insights.
Example:
- User 1 uses Account Data 1 to monitor their Coinbase exchange balance.
Why loginName Matters
The loginName is a unique identifier you assign to each user when creating them in Vezgo. It ensures accurate mapping between your app and Vezgo.
Key Reasons
- Uniqueness:
- Prevents data overlap (e.g., two users with the same
loginNamewould share data).
- Prevents data overlap (e.g., two users with the same
- Linking:
- Maps your app’s user IDs to Vezgo (e.g., User ID
12345→loginName: user_12345).
- Maps your app’s user IDs to Vezgo (e.g., User ID
- Data Access:
- Ensures API requests fetch the correct user’s data.
- Security:
- Bearer tokens are tied to
loginName, restricting access to authorized users.
- Bearer tokens are tied to
- Scalability:
- Supports growth without confusion as more users are added.
How It Works
- Creation:
- Send
POST /auth/tokenwith your API key andloginName→ Get a bearer token.
- Send
- Consistency:
- Use the same
loginNamefor all requests for that user to avoid creating duplicate profiles.
- Use the same
- Retrieval:
- Use the bearer token to access that user’s data via
GET /accounts/{account_id}.
- Use the bearer token to access that user’s data via
Best Practices
- Make it unique: Ensure no duplicates within your app.
- Keep it consistent: Use the same
loginNamefor all calls per user. - Keep it simple: Align with your app’s user IDs (e.g.,
user_12345). - Avoid sensitive info: Don’t use personal data like emails unless necessary.
Summary
- Get API Keys: Create API keys via the Vezgo Portal for your environments.
- Create Users: Use
POST /auth/tokenwith a uniqueloginNameto generate bearer tokens. - Connect Accounts: Link users to crypto, blockchain, CEX, and wallet accounts via the Vezgo Connect Widget.
- Retrieve Data: Use API calls like
GET /accounts/{account_id}to fetch data. - Use Data: Integrate into your app for financial features.
The loginName ensures a secure, seamless connection between your app and Vezgo.